Unified Processing Guide for the Proximity and Light Sensing Malfunction in A1K Series Models
1. Background:
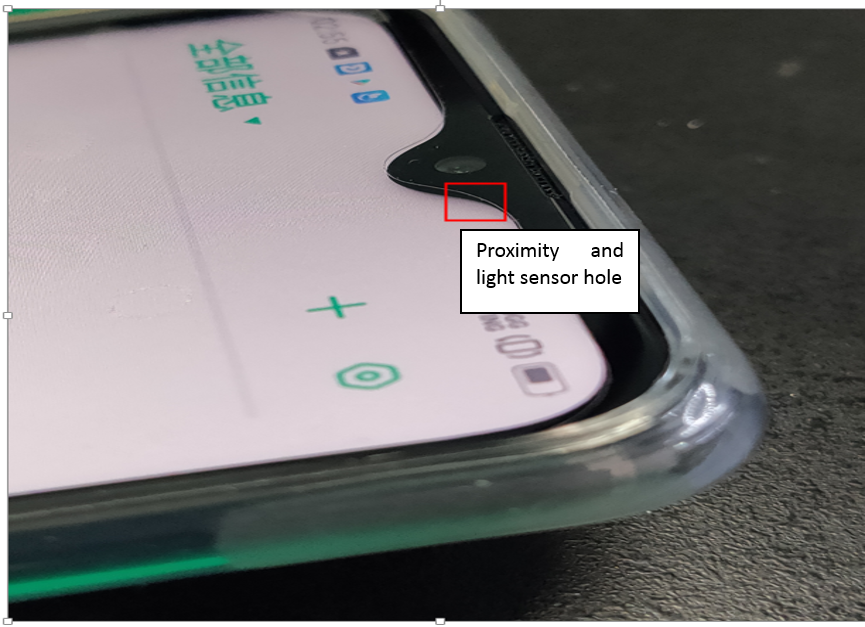
In order to get the unique screen design of the A1K series models, we adopt the micro-slit Proximity and light sensing scheme (shown below) in the proximity; but the position of Proximity and light sensor are easily covered by the protection film, which will leads to malfunction of Proximity and light sensors.
2. Malfunction phenomenon:
Proximity sensor:Black screen when dialing /black screen during inbound calls / Screen not off when answering calls/ Screen not on when keeping the phone away from the ear, etc.;
Light sensor: The Auto Brightness Failing to adjust when circumstance changes.
3. Cause:
The fault may result from that the protective film covers the proximity and light sensor IC, or calibration has not been operated after assembling the motherboard.
4. Solution:
Follow the operation as follows if the phone brought by the costumer is with light sensor malfunction.
4.1 Procedures for the fault cause confirmation:
Light sensor:
4.1.1 First, test the phone according to test steps 4.2.1-4.2.3 for the light sensor to check whether the light sensor function is sound. If the test passes, the light sensor is sound; if the test fails, operate the step 4.1.2;
4.1.2 Confirm whether the light sensor function area has been covered by dirt, protective case and protective film. If there is dirt, clean the screen, put the mobile phone horizontally for 5s on the table, and then test the phone according to the test steps 4.2.1-4.2.3 for the light sensor function. If the test passes, the light sensor is sound; if the test fails, operate the step 4.1.3;
4.1.3 Calibrate the phone according to the light sensor calibration steps 4.3.1-4.3.4. and tested the phone according to the light sensor function test steps 4.2.1-4.2.3 after the calibration passes;
4.1.4 Re-operate the test step 4.2.1-4.2.3 for the light sensing function for three times to catch the LOG; Save the LOG videos, and then send them back to China HQ.
Proximity sensor:
4.1.5 First test the phone according to the proximity function test steps 4.2.4-4.2.7 to check whether the proximity function is sound. If the test passes, the light sensor is sound; if the test fails, operate the step 4.1.6;
4.1.6 Confirm whether the proximity sensor function area has been covered by dirt, protective case and protective film. If there is dirt, clean the screen, put the mobile phone horizontally for 5s on the table, and then test the phone according to the test steps 4.2.4-4.2.7 for the light sensor function. If the test passes, the light sensor is sound; if the test fails, operate the step 4.1.7;
4.1.7 Calibrate the phone according to the proximity sensor calibration steps 4.3.5-4.3.7. and tested the phone according to the proximity sensor function test steps 4.2.4-4.2.7 after calibration PASS;
4.1.8 Re-operate the proximity sensing function test step 4.2.4-4.2.7 for three times to catch the LOG; Save the LOG, and then send them back to China HQ.
4.2 Test steps for sensing function
Light sensor:
4.2.1 Make sure that there is nothing covering the front screen of the mobile phone, enter *#899# -manual test –device debugging –light sensor –light intensity test(Figure 1);
4.2.2 Tap into “light intensity test “interface; Use a black object (Using hand is not allowed) or a plastic bag with black inside to cover the light position to check whether the light intensity value is 0 or not (Figure 2);
4.2.3 If the light intensity value is 0, the light sensor function is sound; If the light intensity value is not 0, the light sensor function is defective and the leak calibration should be operated; After calibration, re-test the light sensor function according to the operation method as steps 4.2.1-4.2.2.
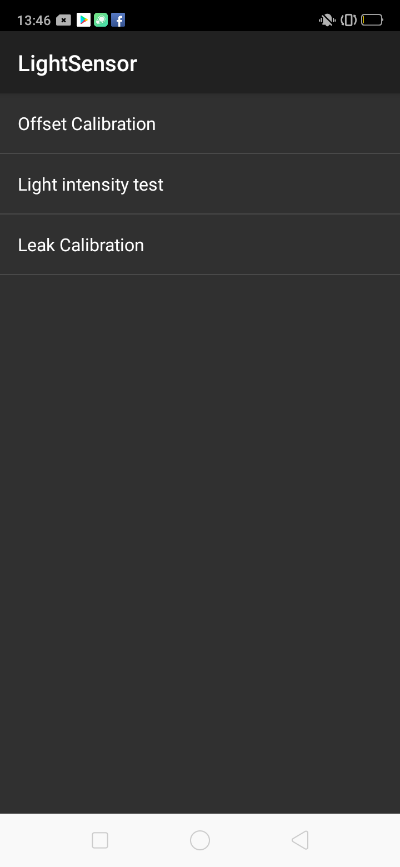 Figure1
  Figure2
Proximity sensor:
4.2.4 Make sure that there is nothing covering the front screen of the mobile phone, enter *#899# -manual test –device debugging -proximity sensor test (Figure 3);
4.2.5 Tap into “proximity sensor test “interface; if the interface is black, proximity sensor function is sound; if the test interface is green, the proximity sensor function is defective (Figure 4);
4.2.6 Use the hand to cover the proximity sensor hole. If the test interface turns green, the proximity sensor function is sound; if the test interface is still black, the proximity sensor function is defective (Figure 5)
4.2.7 Then remove the hand. If the interface changes back to black and shows PASS, the function is sound; If the green does not change, the function is defective (Figure 6)
4.2.8 Repeat steps 4.2.4-4.2.7 of the Proximity sensor function test operation.
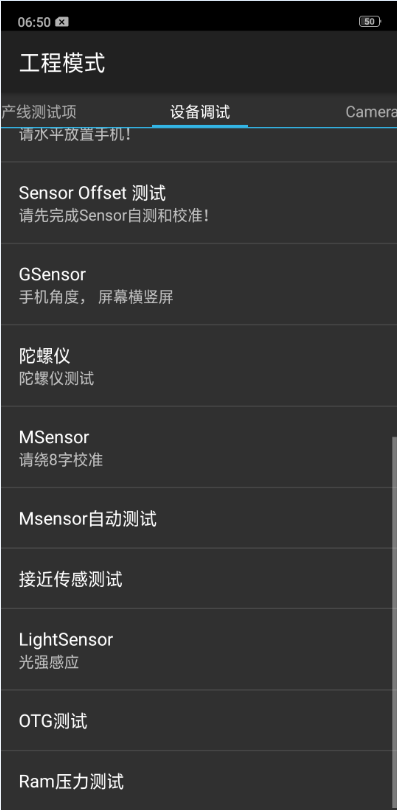 Figure3
 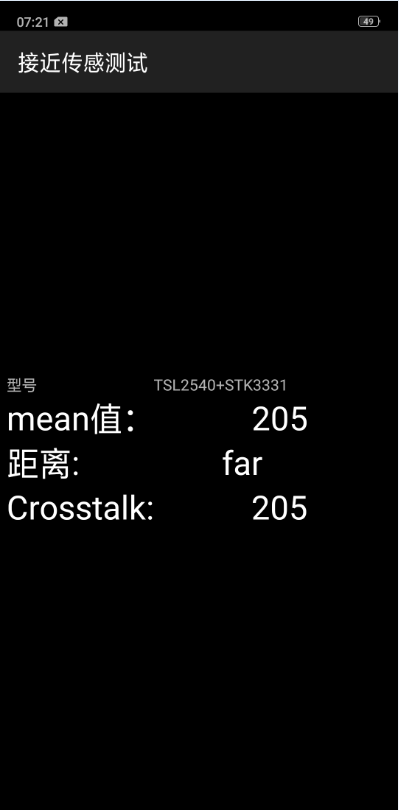 Figure4
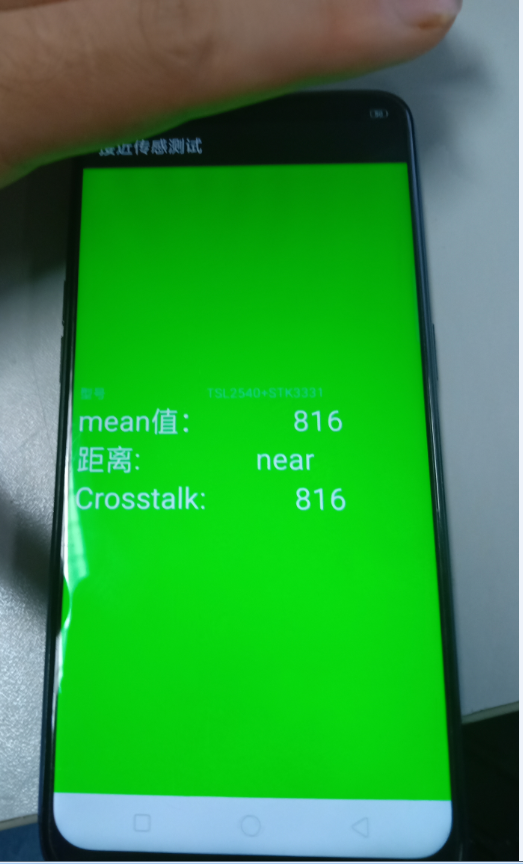 Figure5
 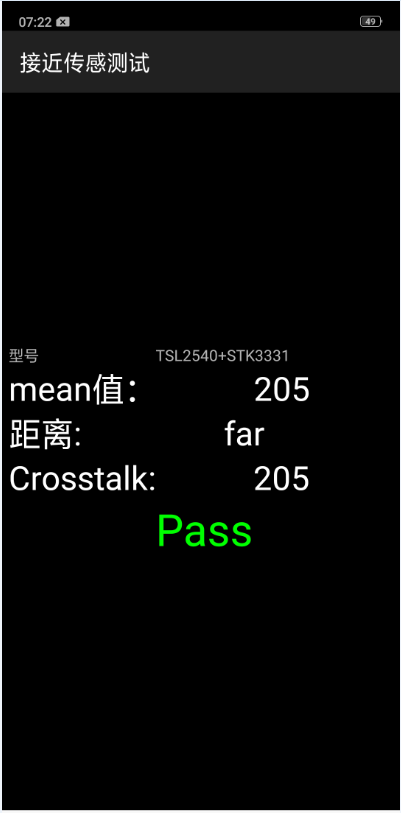 Figure6
4.3 Calibration Steps for sensor function
Light sensor:
4.3.1 Make sure that there is nothing covering the front screen of the mobile phone, and enter *#899# -manual test –device debugging –Light sensor –Leak Calibration (Figure 7);
4.3.2 Enter the password “6776”,and tap “OK” to enter the “leak calibration “interface; (Figure 8);
4.3.3 Use a black object (Using hand is not allowed) or a plastic bag with black inside to cover the light position and start the “leak calibration “(Figure 9);
4.3.4 Re-test the light sensor function according to the operation method as steps 4.2.1-4.2.3 after calibration.
 Figure7
  Figure8
 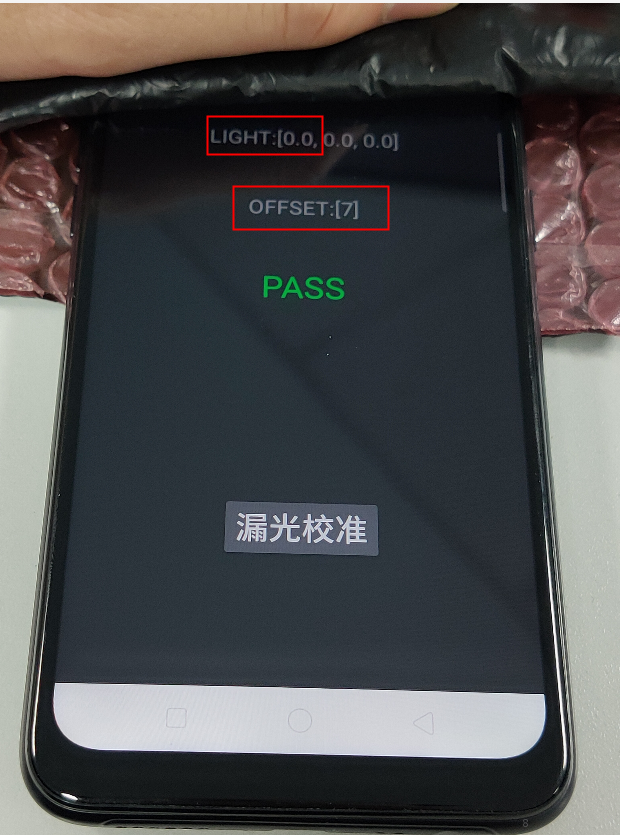 Figure9
Proximity sensor:
4.3.5 Make sure that there is nothing covering the front screen of the mobile phone, and enter *#899# -manual test –device debugging –proximity sensor –proximity calibration;(Figure 10)
4.3.6 Enter the password “6776”,and tap “OK” to enter the calibration interface(Figure 11);
4.3.7 Make sure that there is nothing covering the front screen of the mobile phone, and tap the “offset calibrate” ,( For aftersales, “3CM gray chart calibration” is not needed),After 5s, exit the calibration interface. (Figure 12)
4.3.8 Re-test the light sensor function according to the operation method as steps 4.2.4-4.2.7 after calibration;
 Figure10
 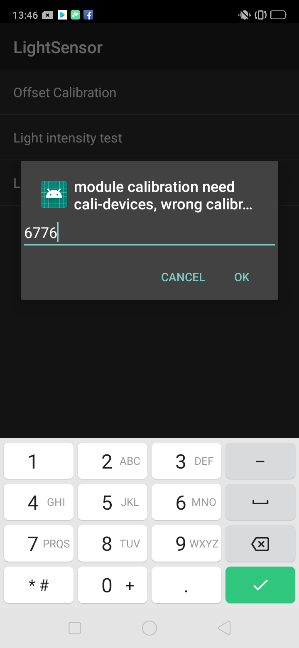 Figure11
 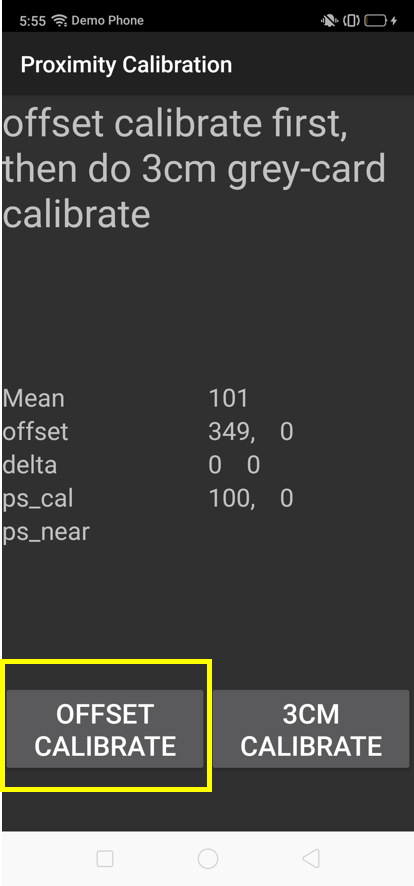 Figure12
5. Operation instructions for applying the protective film:
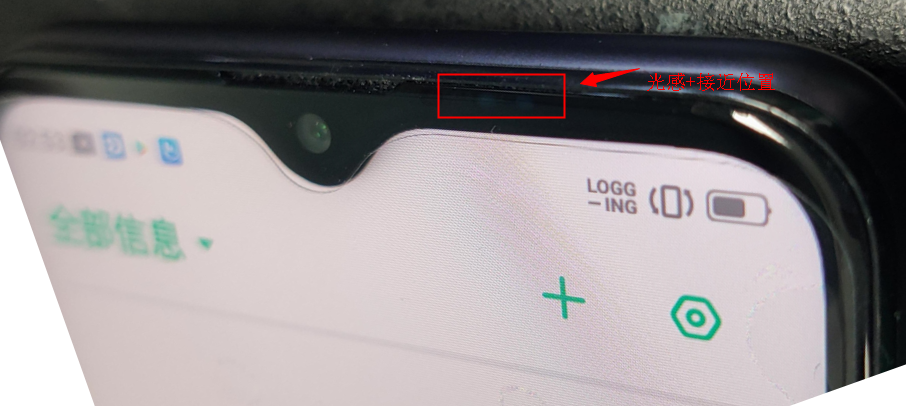
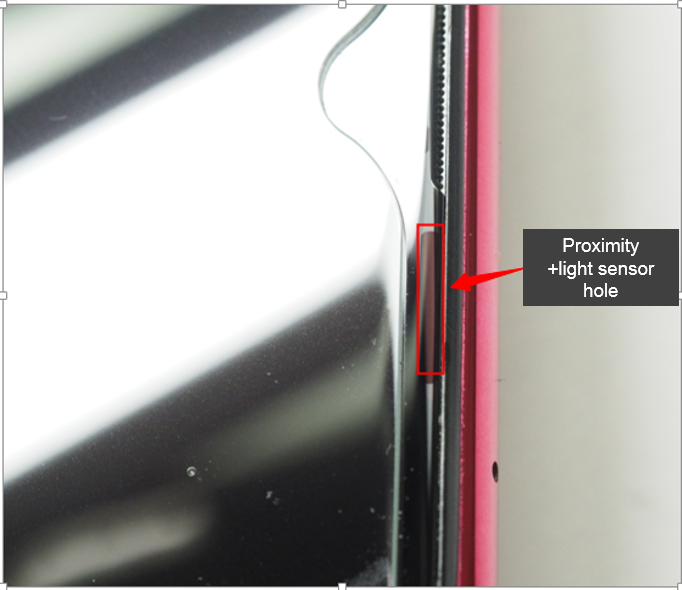
When applying protective film for the A1K models, open the message interface, and align the top of the protective film with the top of the message interface as shown in the figure below.
After applying the film, check whether there are any bubbles or any other malfunctions under the strong light, making sure that the light sensor is not covered by the protective film; And check the proximity sensor function according to test steps 4.2.1-4.2.3.
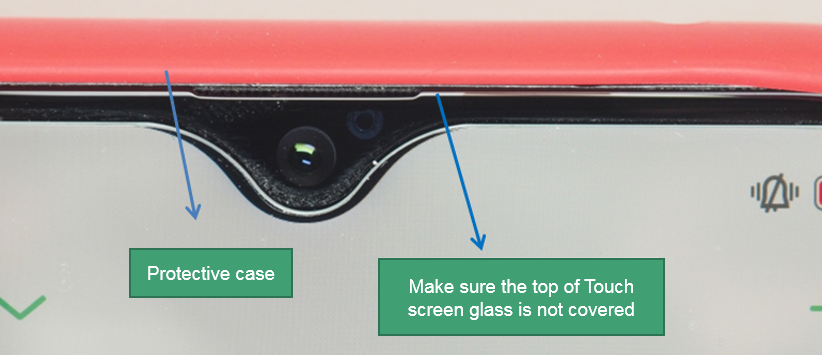
6. Precautions for protective case assembly
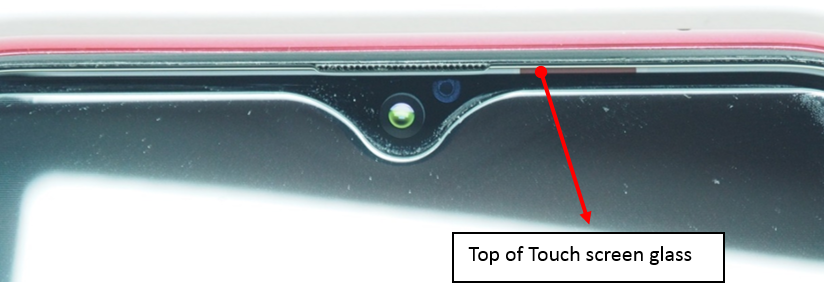
If the protective case frame covers the proximity sensor hole, the function of proximity sensor will be defective .So when assembling the protective case, make sure that the top of the touch screen glass has not been covered by the protective case.
Precautions: “leak calibration”, "light sensor test “, “Calibration without covering” and “Proximity test “must be operated once the phone is reassembled.
Sponsored Deals
Advertisement · Hand-picked offers, refreshed regularly
These are paid/affiliate advertisements from our partner store and are not related to OPPO or OPPO spare parts.
Related Articles
Proximity and Light Sensors: Where to Find Them in Your Panoramic Phone?
Sponsored Deals
Advertisement · Hand-picked offers, refreshed regularly
These are paid/affiliate advertisements from our partner store and are not related to OPPO or OPPO spare parts.