Built-in Battery Remove Instruction and Regulation V1.4
| Revise History | ||||
|---|---|---|---|---|
| Version | Revise Contents | Revised by | Verified by | Date |
| V1.1 | Add regulations about metal objects use and placement | Miller | Raymond | 2016-10-11 |
| V1.2 | Instruction on easy-tore tape attach, how to handle deformed battery, forbidden use battery category, and how to handle scraped battery | Miller | Nick | 2017-02-06 |
| V1.3 | Add battery appearance inspection standards and treatment instruction | Miller | Nick | 2017-07-03 |
| V1.4 | Update remove specification on built-in battery covered by 2rd generation easy tear paper; bad material (battery) package method instruction | Miller | Nick | 2017-11-06 |
Content
1. Purpose
2. Built-in Battery Installed Modes
3. Built-in Battery Remove Precautions
4. Appearance Inspection Standards and Treatment Instruction
5. Operation Details
6. How to handle scraped battery
7. Special Instruction
8. Regulations on Built-in Battery Remove
1. Purpose
This instruction collates the installation method and corresponding remove method of built-in battery at present, to make it as operation specification in service center, and prevent improper operation of safety hazards caused by cell damage.
2. Built-in Battery Installed Modes
There are totally 3 installed modes of built-in battery, which can be sequenced by the time of its model coming into market: double-sided installation, easy-pulled tape installation, and double-sided tape covered by easy-tore paper.
3. Built-in Battery Remove Precautions
3.1 Do not use a heat gun or a hot hair dryer and other heating equipment to directly heat the battery across the cover;
3.2 Do not use suction cup, card, or hand etc. to remove the battery in the case of not using alcohol to soak the double-sided adhesive;
3.3 Do not use sharp metal objects such as metal tweezers, to directly contact the battery surface and remove the auxiliary materials on it (such as graphite cooling fin);
3.4 Do not place the removed battery with metal objects like screws or stack it one by one;
3.5 Do not use deformation, breakage and non-sticky double-sided adhesive and easy-tore paper;
3.6 Do not use damaged battery stickers, punctured surface, bulged and leaking battery;
3.7 Do not use any metal sharp object such as blade, metal pry bar etc. during battery removal;
3.8 Do not use metal tweezers to disassemble any other components other than decorative sheets;
3.9 Keep the removed battery away from the metal parts and place separately, to avoid short circuit;
3.10 Before loading the battery, make sure that there are no foreign matters in the battery surface and battery compartment;
3.11 Do not continue to use the dropped or severely deformed battery (Battery that is found a slight deformation at the first removal, but continues to be removed without injecting alcohol.)
3.12 Any act of adding privately or changing the standard operation of battery remove of this instruction is not allowed.
4. Appearance Inspection Standards and Treatment Instruction
4.1 Inspection Standards
| NO. | Defect Name | Picture | Defect judgement |
| 1 | Broken | 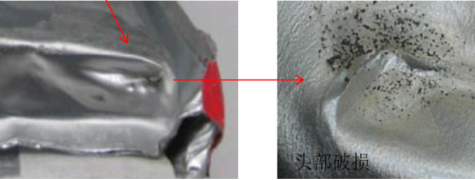 |
No broken is allowed |
| 2 | Leakage | \ | No leakage is allowed |
| 3 | Bulge |  |
No Bulge is allowed |
| 4 | Severe deformation | \ | No severe deformation is allowed |
| 5 | Heat | \ | Heat/hot caused by internal short circuit of battery core without burning signs is not allowed. |
| 6 | Corner Deformation | 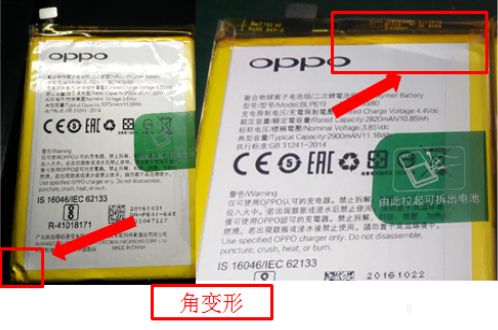 |
Corner deformation caused by squeeze interfering battery body is not allowed |
| 7 | Scratch | 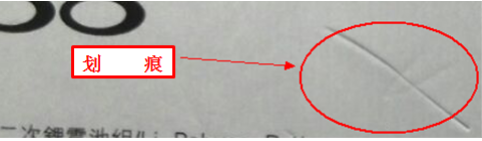 |
Scratch cannot hurt the bottom material of battery; slight scratch shall be between 20mm to 30mm, of which distance shall be within 10mm, with the quantity of no more than 2; it’s not allowed that the length is over 30mm. |
| 8 | Wrinkle |  |
Wrinkle with length≤25mm on one side can be 2, but distance shall be a above 20mm; wrinkle with length between 25mm and 40mm(included) on one side can be 1; the above wrinkle width is not allowed to larger than 1mm, the raising height shall be within 0.1mm, any height oversized is not allowed. |
| 9 | Dent |  |
0.6mm ≤Max diameter<1.2mm, distance within 20mm, allow 3 points; max diameter over 1.2mm is not allowed; max height shall be 0.3mm, not allow to cross over; if it’s dent mark, there will be OK to have 3 if the length is<10mm, width<0.5mm, depth<0.1mm, any exceeding is not allowed. |
| 10 | Bump | \ | Bump point: 0.6mm ≤Max diameter<1.2mm ,distance within 20mm, 3 points are OK;Max diameter above 1.2mm is unacceptable, and largest height is 0.3mm, any exceeding is not allowed; bump mark is allowed to have 2 with 5mm length on single side, and largest height 0.3mm, distance 20mm; any exceeding on height is unacceptable, bump mark length ≥5mm is not allowed. |
| Notes: 1. For items that are not covered by this standard, the service center shall make reasonable judgment according to actual needs; 2. The battery that conforms to the above situation (not least) needs to operate under the following processing guidelines. |
|||
4.2 Treatment Instruction
Basic principle: Ensure that user handset is repaired in customer service center, there will not be any potential safety hazard.
2.1 If found that user battery is damaged during repair, according to the regular warranty policy to remind users of replacing the battery; if user is unwillingly to pay for the battery, it’s suggested to give warranty treatment by quality record.
2.2 If user battery is damaged by service staff during repair, it’s suggested to replace the battery for user and take it as special record. Meanwhile, the document Built-in Battery Remove Instruction and Regulation must be learned again to avoid the same situation happening again.
5. Operation Details
5.1 Precautions of Battery BTB Buckle and Unbuckle
There are 3 power off methods before removing the battery (long press power key 8s/volume up key & power key 8s/ use system power off option), to completely cut off the power and protect the battery and electronic components in the greatest degree. (Notes: Phone data may be lost if removing battery without power-off; meanwhile, due to the complicated electric components on mother board, short circuit may occur caused by the accidental touch while repairing);
Unbuckle the BTB, be careful not to break down the FPC; please refer to the below instruction:
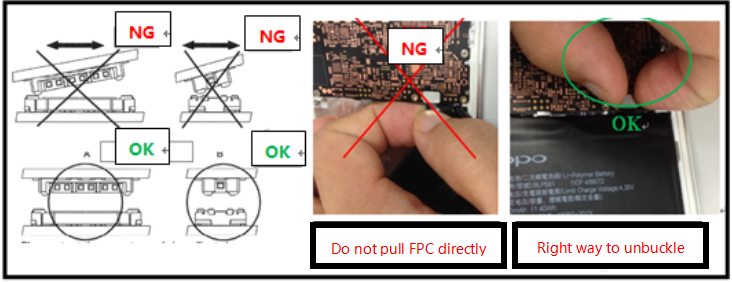
Attention:
1. Catch the both sides of steel sheet or use fishing line to unbuckle BTB, and it’s not allowed to pull FPC directly;
2. Before buckling , BTB needs to be aligned flatly and precisely; shake slightly male connector towards left and right, press and buckle up when it slides into female connector, in case of damage caused by dislocation connection;
3. When replacing spare parts that need to remove battery(ex: screen assembly), other materials disassembly (ex: screws, main board, antenna plate) must come after battery remove; for models with battery BTB pressing plate, remove the plate first; if materials disassembly can be done with removing battery(ex: main board, antenna plate, camera etc.), battery BTB must be unbuckled first.
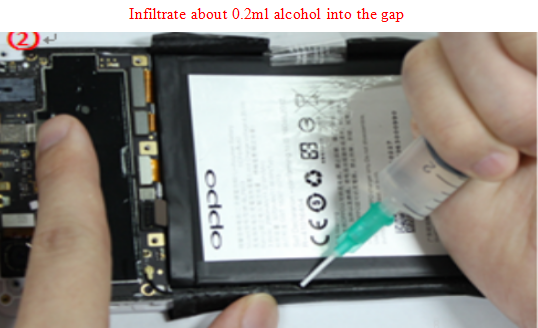
5.2 Remove Method of Battery fixed by Double-sided Tape and Easy-pulled Tape (By using alcohol and card)
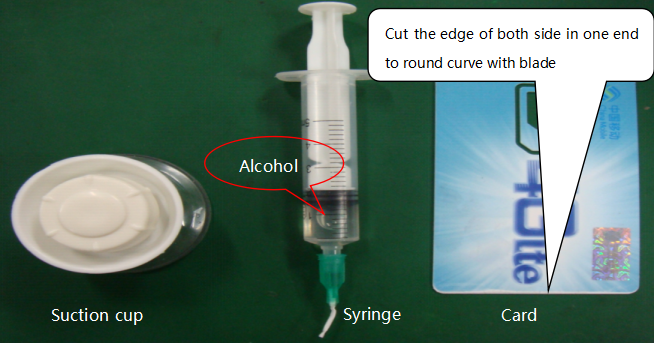
5.2.1 Tools needed: syringe, plastic needle, card, alcohol, and suction cup, shown as below
5.2.2 Along the edge of the battery, drop about 0.2mL alcohol by using syringe, then stand up the device and make the alcohol vertically penetrate the back of cell to infiltrate the double-sided adhesive, using the card to separate battery, as shown below:
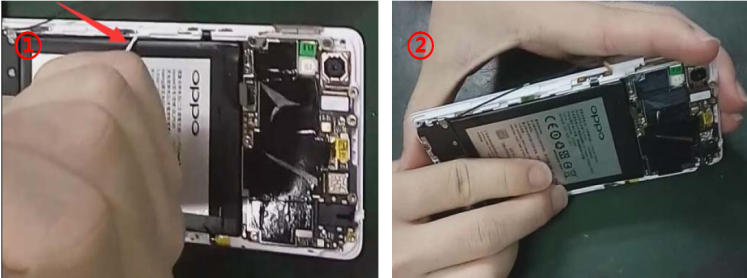
5.2.3 Insert the card into the gap between the battery and frame, slowly put it into the bottom, then separate the double-sided adhesive from battery and remove (Slope down the device when inserting the card in order that the alcohol can easily flow to the adhesive), shown as below:
Attention:
a) The plastic card cannot be deformed or damaged, only smooth and rounded edges can be used;
b) For weak stickiness models, like R5 etc., the card can be replaced by the suction cup to remove the battery by dropping the alcohol;
c) Pay attention to protect the press key FPC of the bottom of the battery or display FPC while removing.
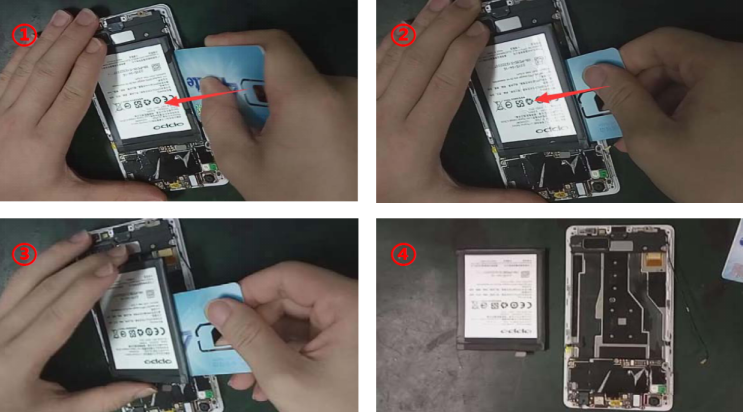
5.3 Remove Method of Double-sided Fixed Battery covered by Easy-tore Tape
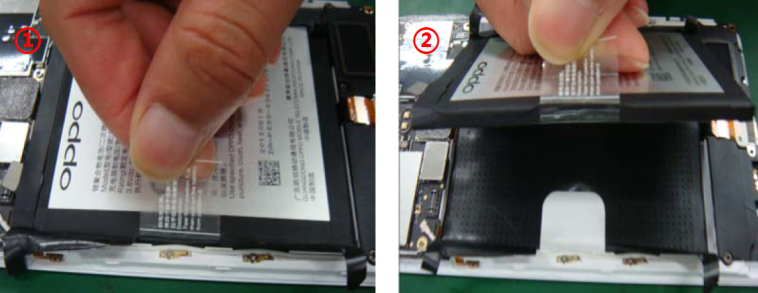
There are two kinds of easy-tore tapes: generation 1 and 2 (firstly used in model A39, which will be applied in models launched after A39), the difference is shown as follow:
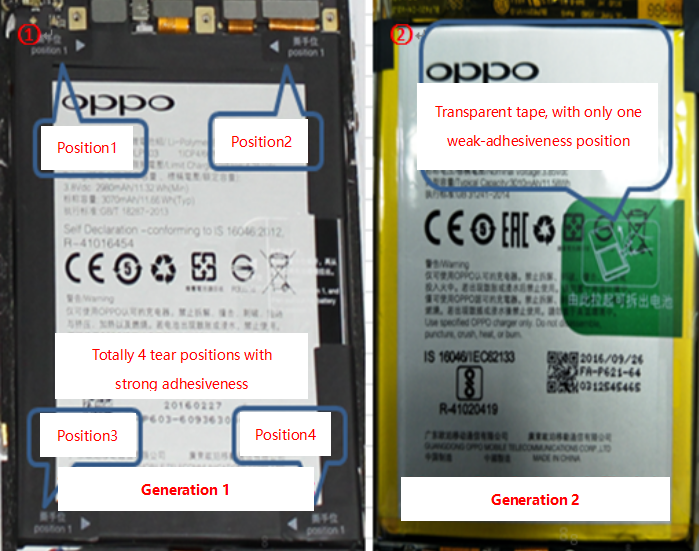
Generation 1
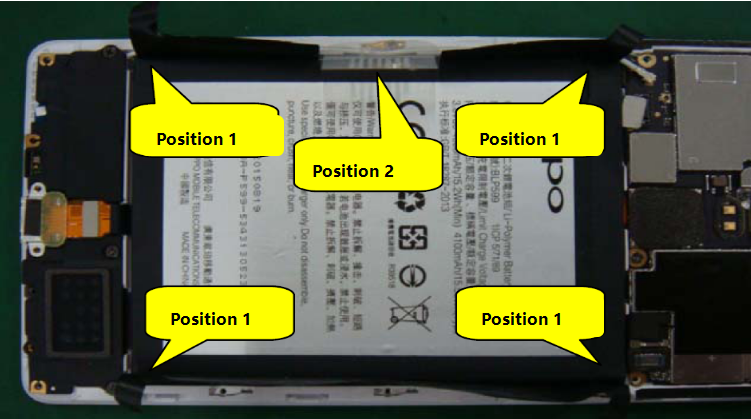
A) To tear down “Position 1” respectively in the 4 corners, then pull up from “Position 2”, shown as follows:
B) Infiltrate a little alcohol into the gap between battery and tape with syringe. (Attention: do not drop the alcohol between easy tear paper and battery compartment)
C) Fix both sides of the device by hands, tightly hold position2, and slowly separate battery and tape with upward force; if it’s too difficult to remove or the battery is deformed, stop removing forcibly, it’d better to continue with alcohol infiltration, shown as follow:
Generation 2
A) Place the device on anti-static table, tear off easy-tear paper on battery(No need to tear off the tape on the opposite side of pull position );
B) Drop around 0.2ml alcohol with syringe into the gap between battery and tape (Attention: do not drop the alcohol between easy tear paper and battery compartment);
C) Slowly stand up the device sideward for 5-10s, infiltrating the alcohol to soak up double-side tape between battery and easy tear paper; then hold the device at both ends, separate battery from easy tear paper straight and slowly by pinching the pull handle; take out the battery and the tape together with hands when pulling to the end, and do not take up easy tear paper by pulling up battery;
D) If it’s too difficult to remove or the battery is deformed, stop removing forcibly, it’d better to continue with alcohol infiltration and wait for 3-4s;
Shown as follow:
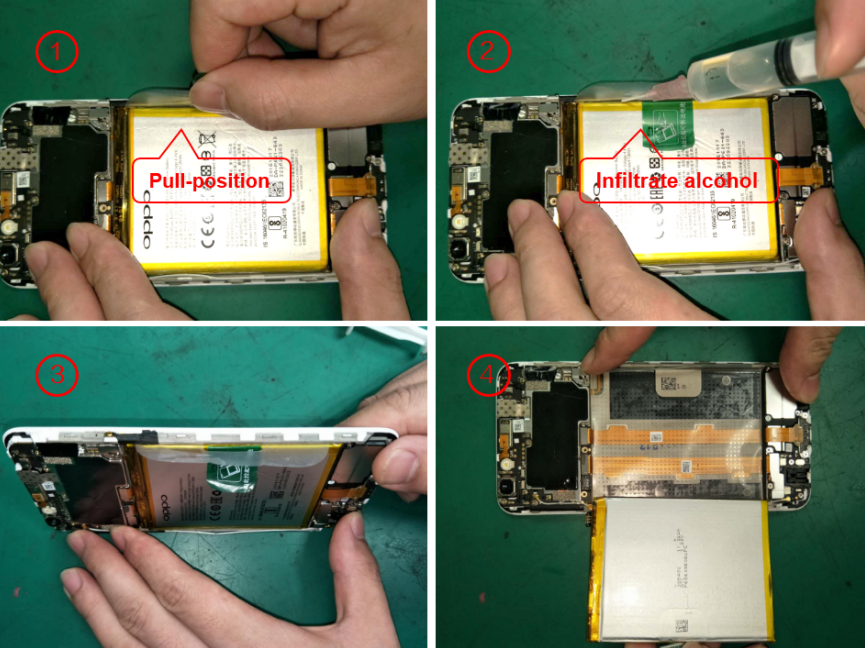
Attention:
a) Keep straight when pulling battery, to avoid deformation; If it’s too difficult to remove or the battery is deformed, stop removing forcibly, it’d better to continue with alcohol infiltration and wait for 3-4s;
b) When using syringe to drop alcohol into the gap between battery and easy tear paper, the ink of the battery will be a bit off, this is normal phenomenon.
Note: Please refer to the disassembly videos in FTP for more details about the above battery remove.
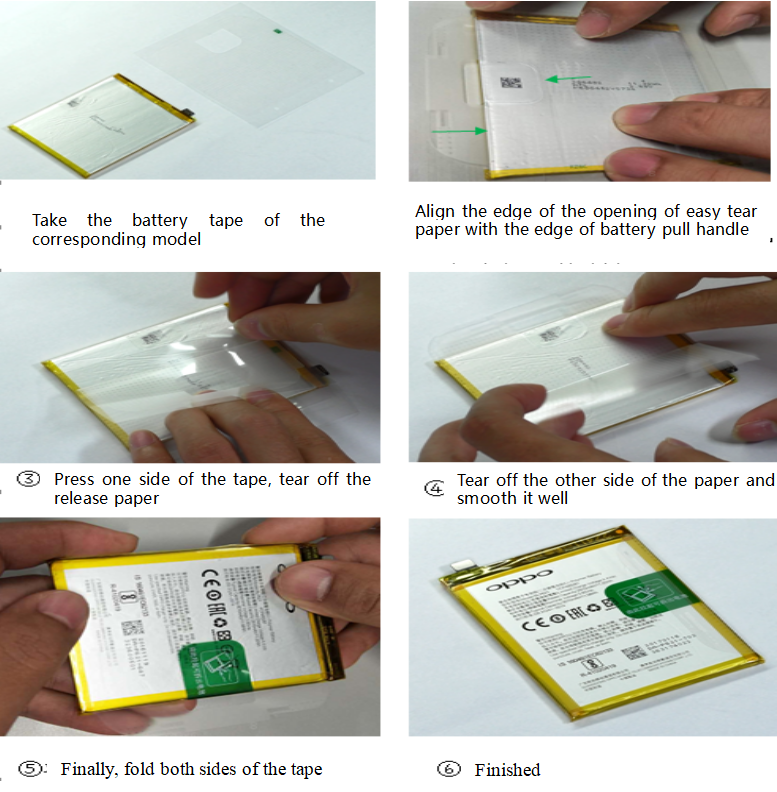
5.4 Instruction on easy-tore tape attachment
Generation 1
Place the tape on the table after tearing off the release paper, with the adhesive side upward. Place the battery front side (the side with print information) upward, and place the gap of the tape towards the right of the battery; then align the left and right side of the battery with the cut line of the tape (shown as the red line), and align the up and down side well with the edge of the tape, attach as follow:
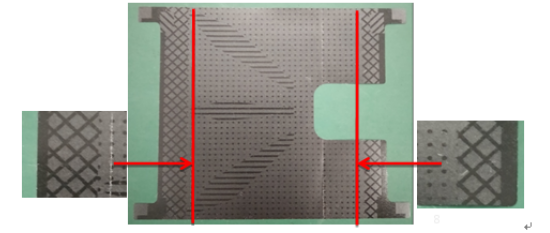
After the battery is attached on the tape, flatten it and remove the air bubbles; then wrap the battery on the left and right sides with tape as shown below:
Generation 2
Take the battery tape of the corresponding model and put it on the anti-static table;
Align the edge of the opening of easy tear paper with the edge of battery pull handle(leave 1-3mm distance, in case of the overlap of easy tear paper and pull position), the easy tear paper sticky line and the edge of the battery need to be aligned as well;
Press one side of the tape, tear off the release paper and smooth it well;
Tear off the other side of the paper and smooth it well;
Finally, fold both sides of the tape.
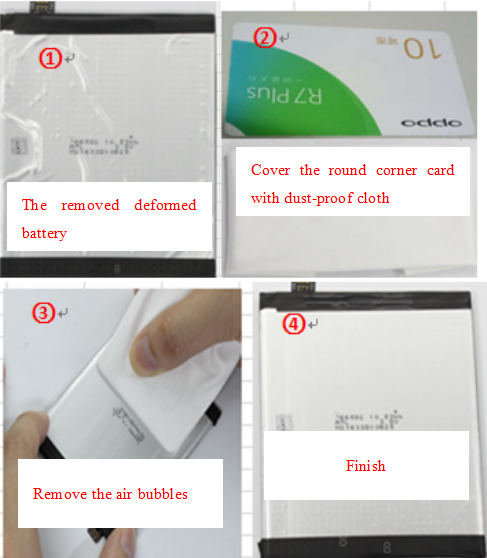
5.5 How to handle deformed battery
Place the deformed battery on the smooth, clean, and particle-proof anti-static table, slightly flatten the battery by hand, then smooth it down with round corner card covered by dust-proof cloth, make sure the appearance is flat and intact and BTB is not broken down, and cover it well by replacing the new tape, show as below:
5.6 Forbidden use battery category
Check the appearance of removed built-in lithium battery, to ensure it’s clean, smooth, undamaged. If there shows the surface of the battery label damage, aluminum plastic film damage, electrolyte leakage, deformation and other undesirable phenomena, it’s not allowed to reuse. Typical disassembly defect is as follows:

6. How to handle scraped battery
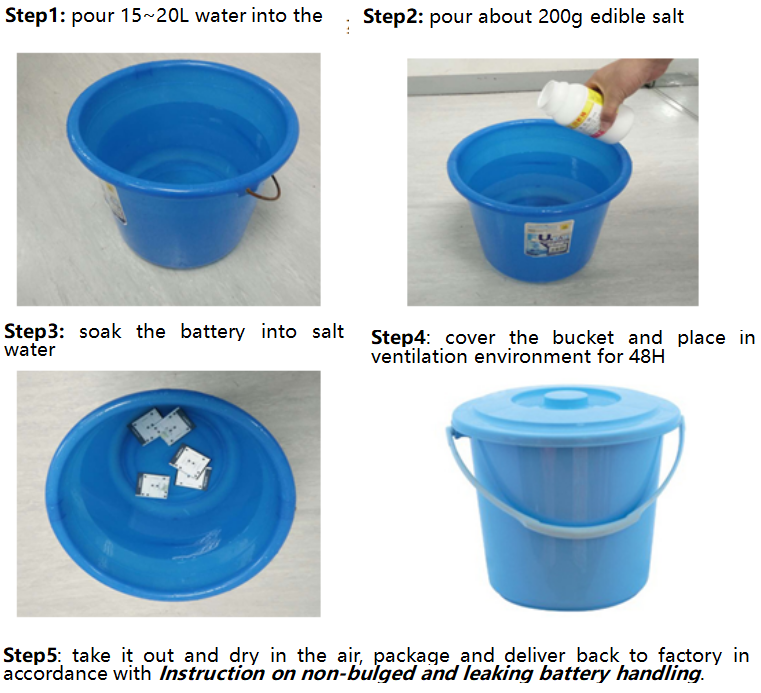
6.1 Instruction on bulged and leaking battery handle
Separately place the bulged and leaking battery, and soak it into the salty water after collecting over 5pcs, do as the below steps:
Note: there may have an odor during the soaking, it’s suggested to figure it out by replacing salty water in time.
6.2 How to handle non-bulged and leaking battery
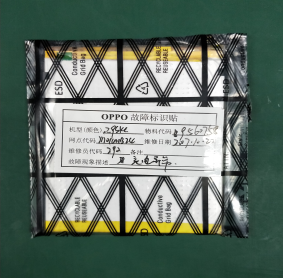
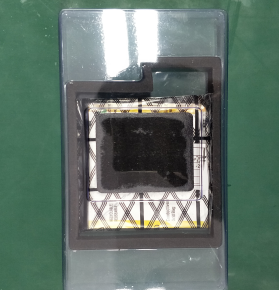
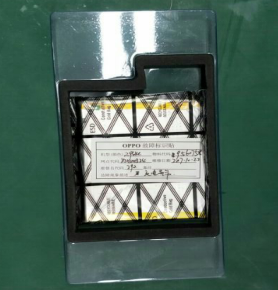
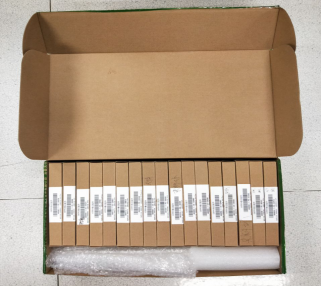
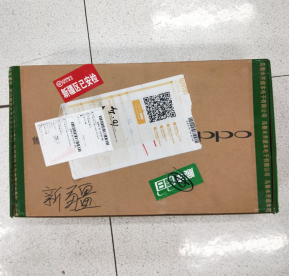
Package non-bulged and leaking battery with black anti-static bag and battery blister plastic , and it’s required that every single cell is ought to be packaged in one box individually; the fault sticker is attached to the battery anti-static bag, and the packed batteries are packed into the express box. If there is remaining space left in the box, it’s needed to fulfill it with soft stuff, which is to avoid battery shaking during transportation. Do as the following steps:
Note: It’s not allowed to package the battery with other spare parts together, which means it must be separately packaged and delivered.
| Step1:Put the bad battery into the anti-static bag (FPC face the sealing direction) seal and put the fault sticker on the anti-static bag on the back of the battery | Step2:Put the bad battery into blister plastic (down). Notes: the FPC of the battery faces to the bulge part of battery blister plastic (down) |
 |
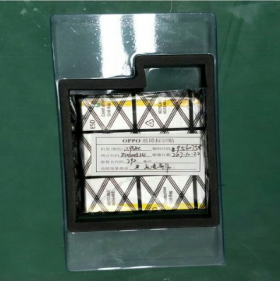 |
| Step3:Take the packed battery, close the blister plastic (up) | Step4:Take the battery packed with blister plastic, and put into the box, close it |
 |
 |
| Step5:Put the packed batteries into the express box and fill in the soft matter if there is free space | Step6:Pack and return to the head warehouse |
 |
 |
7. Special Instruction
R5 battery must be replaced after being removed.
Comparing to other models, R5 battery is thinner and softer, which will lead to easy deformation during remove and even safety accident. To avoid this potential risk, the removed battery cannot be reused and change a new one, no matter it’s in warranty or out of warranty, as long as it’s uninstalled. For now, the disassembly steps related with battery remove include replacing main board top cover assembly and the battery itself.
8. Regulations on Built-in Battery Remove
Those who do not conform to this instruction will be punished according to the following different circumstances:
1. The agent will be fined 200 US dollars per time if any disobeyed behaviors are found by OPPO HQ representatives;
2. All costs caused by the complaint and 400 US dollars per time punishment will be borne by agent, if any disobeyed behaviors are complaint by user, agent or media, and have adverse effects on company or service center;
3. All costs and 1000 US dollars per time punishment will be borne by agent, if any disobeyed behaviors cause fire, liquid leakage and explosion, consequently resulting in loss of life and property safety.
The fine will be conducted in the monthly reimbursement sheet of each agent.
This regulation will come into force since published, and V1.3 will be invalidated as from today!
If have any question, please contact Technical Support Team.