OPPO Enco Free True Wireless Headphones Service Manual

INTERNAL ONLY
Contents
1. Purpose and Requirements
1.1 Purpose
1.2. Product Introduction
2. Product Introduction
2.1 Product Parameters
2.2 Product Color and Picture
2.3 SN Code Identification
3. After-sales Guide
3.1 After-sales policy
3.2 Warranty Instruction
3.3 Maintenance Instruction
3.4 Warranty Time Specification
4. Instruction
4.1 Bluetooth Pairing
4.2 Automatic Connection
4.3 Pairing with Other Devices
4.4 Replace the Ear Tips
4.5 Touch Control
4.6 Wearing Detection
4.7 Charging
4.8 Resetting
5. Function Test
5.1 Bluetooth Connection Test
5.2 Headphones Listening Function Test
5.3 Headphones Call Function Test
5.4 Charging Function Test
5.5 Voice Assistant
5.6 Other Function Test
1. Purpose and Requirements
1.1 Purpose
This article introduces the product parameters, instructions for use, and after-sales policies of the OPPO Enco Free true wireless headphones to guide the customer service center to properly handle the after-sales work of the product.
1.2 Requirements
The customer service center must operate in strict accordance with after-sales policies and order specifications.
2.Product Introduction
2.1 Product Parameters
|
Name |
OPPO Enco Free True Wireless Headphones |
|
Model |
ETI02 |
|
Driver |
13.4mm dynamic driver |
|
Frequency response range |
16Hz-20kHz |
|
Microphone sensitivity |
-42dBV/Pa |
|
Supported audio formats |
AAC/SBC |
|
Bluetooth version |
5.0 |
|
Wireless range |
10m |
|
Battery type |
Rechargeable Lithium-ion battery |
|
Weight |
4.6g(Single earphone) |
|
Battery capacity |
31mAh(Headphones) |
|
Music play time(50% volume) |
5h(Single charge) |
|
Charging time |
70min(Headphones) |
|
Charging Case model |
ETI03 |
|
Input(Charging Case) |
5V⎓1A |
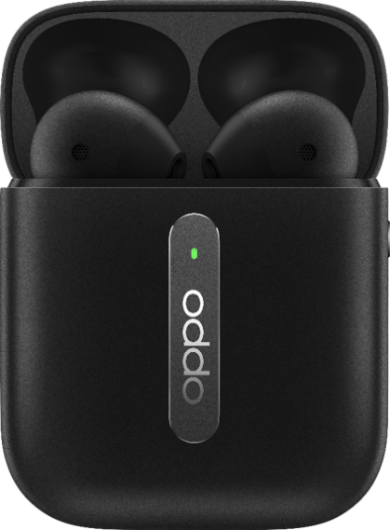
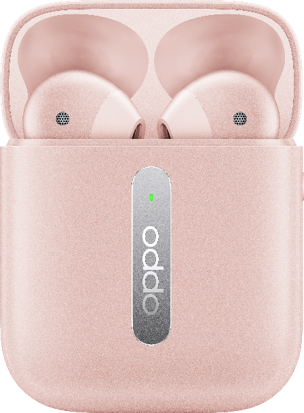
2.2 Product Color and Picture
(1)White
(2)Black
(3)Pink
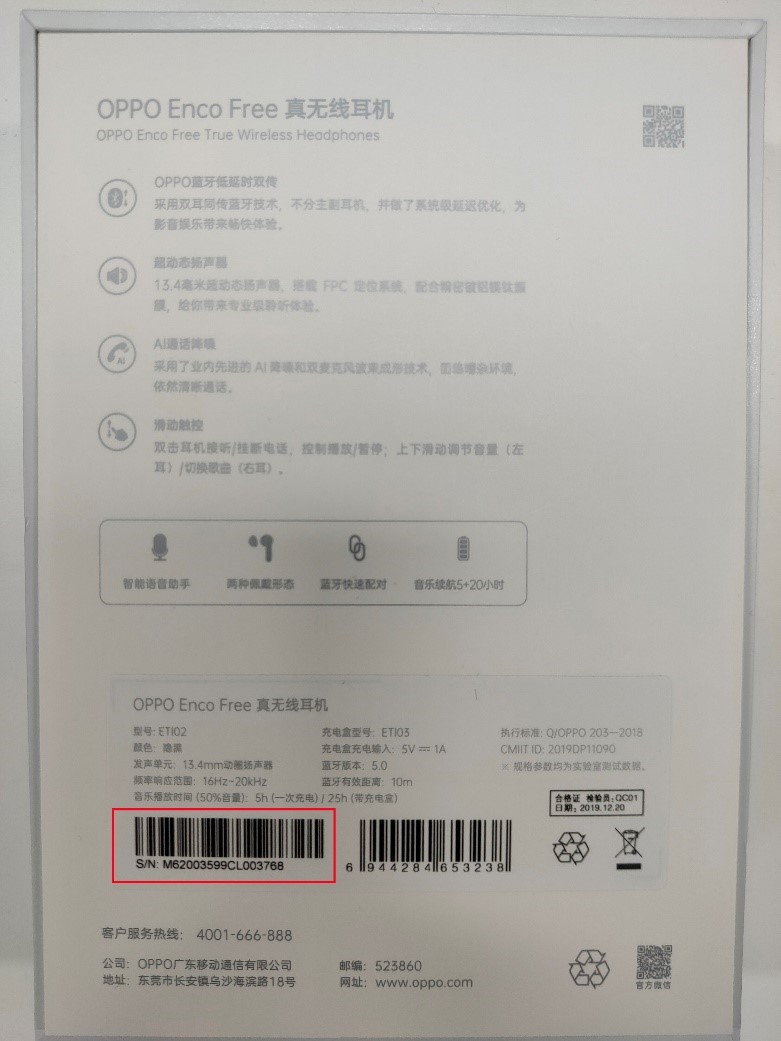
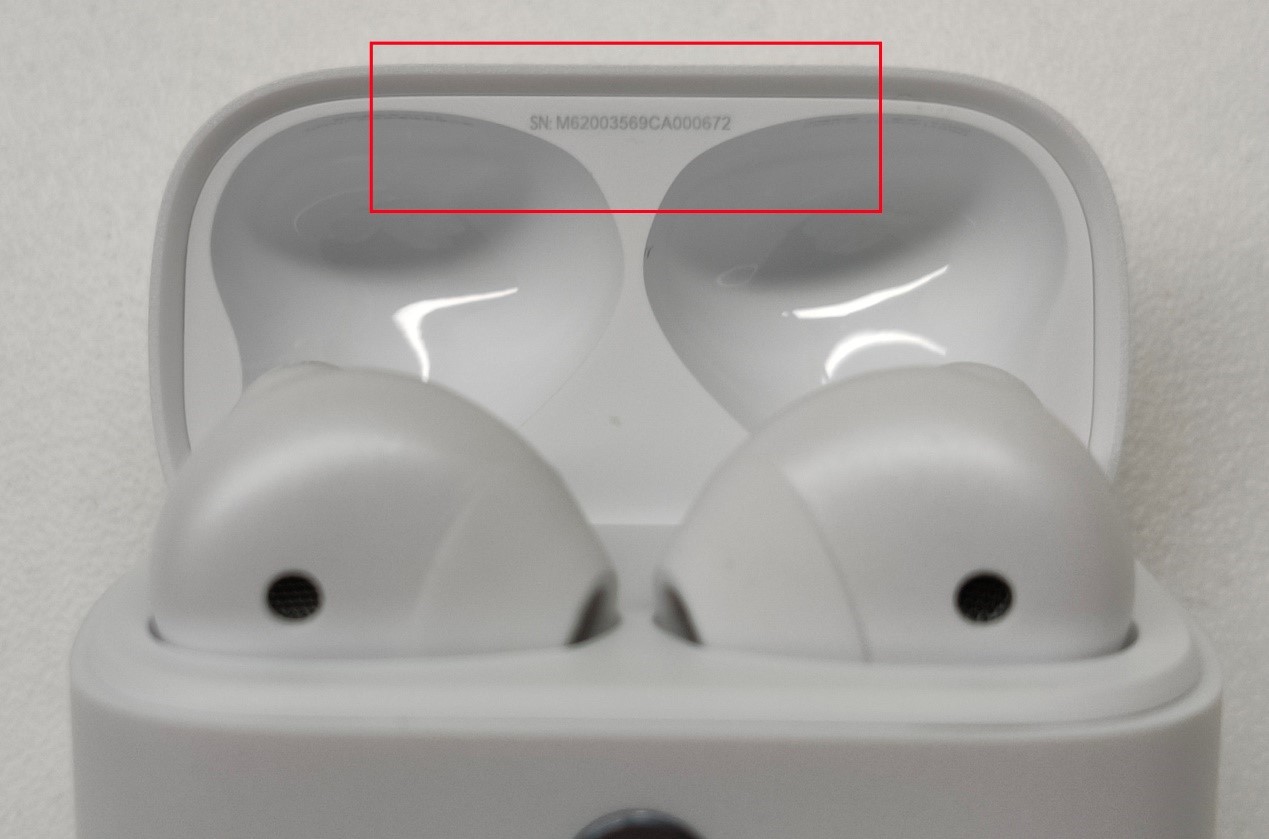
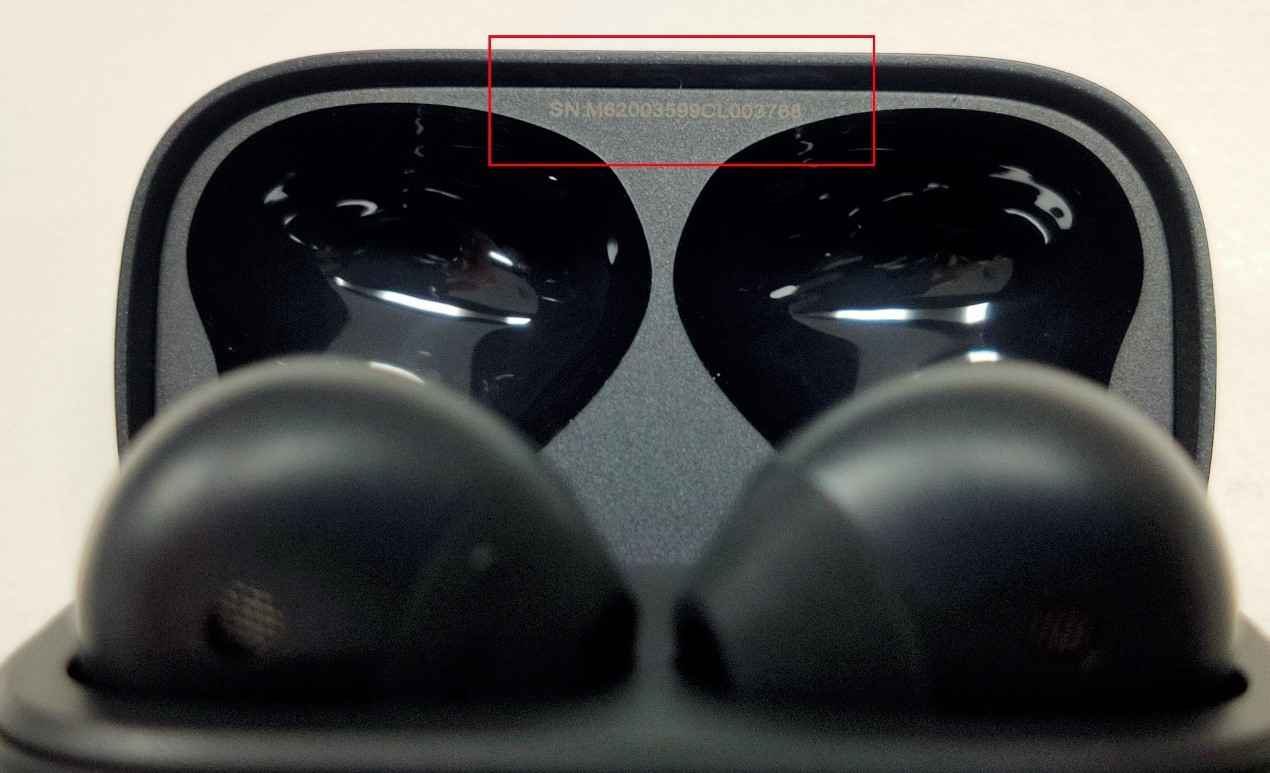
2.3 SN Code Identification
The SN code information of OPPO Enco Free true wireless headphones products is printed on the packing box and the charging case. The SN code is the same, as shown in the red area in the figure:
(1) Packaging box
(2) Charging case
3. After-sales Guide
3.1 After-sales policy
The After-sales policy is implemented in accordance with local regulations.
3.2 Warranty Instruction
① In warranty period, if the left earphone has non-artificial damage and the quality of the product itself, the left earphone accessories can be replaced separately;
② In warranty period, if the right earphone has non-artificial damage and the quality of the product itself, the right earphone accessories can be replaced separately;
③ In warranty period, if the charging case has non-artificial damage and the quality of the product itself, the charging case accessories can be replaced separately;
④ In warranty period, if the USB charging cable is not artificially damaged and the quality of the product itself, the USB charging cable accessories can be replaced separately;
⑤ In warranty period, if the ear tip has non-artificial damage and the quality of the product itself, the ear tip can be replaced separately.
3.3 Maintenance Instruction
① If the left earphone is faulty or missing, the customer can pay for the replacement of the left earphone accessory separately.
②If the right earphone is faulty or missing, the customer can pay for the replacement of the right earphone accessory separately.
③ If the charging case is faulty or missing, the customer can pay for the replacement of the charging case accessory separately.
④If the USB charging cable is faulty or missing, the customer can pay for the replacement of the USB charging cable accessory separately.
⑤ If the ear tip is faulty or missing, the customer can pay for the replacement of the ear tip accessories separately.
3.4 Warranty Time Specification
1. Having proof of purchase: calculate the warranty time with the purchase invoice and warranty card;
2. No proof of purchase: provide the box and identify the SN code, and use the SN code information to query and calculate the warranty date.
3. In the case where the invoice, warranty card, packing box, online purchase record, SN code information query and calculation of the warranty date cannot be provided, No warranty is provided.
4. Instruction
4.1 Bluetooth Pairing
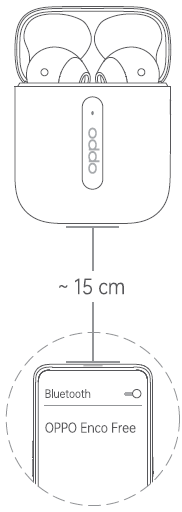
When using for the first time, open the Charging Case and the headphones will start pairing automatically.
Turn on Bluetooth on your device:
• Normal Pairing: On the Bluetooth interface, search and select "OPPO Enco Free".
• Quick Pairing: Hold near unlocked OPPO phone, then follow the onscreen instructions.
※ Not all models support quick pairing. For details, please visit www.oppo.com.
4.2 Automatic Connection
After the pairing record has been recorded, open the Charging Case, then the headphones will connect to your device automatically.
4.3 Pairing with Other Devices
With the headphones in the Charging Case and lid open, press and hold the Function Button untill the Indicator blinks. The headphones then are available for pairing with a new device.
4.4 Replace the Ear Tips

OPPO Enco Free True Wireless Headphones are equipped with 3 types of Ear Tips (the Size S Ear Tips are pre-installed on the headphones). Choose the right Ear Tips for the most comfortable feel.
4.5 Touch Control
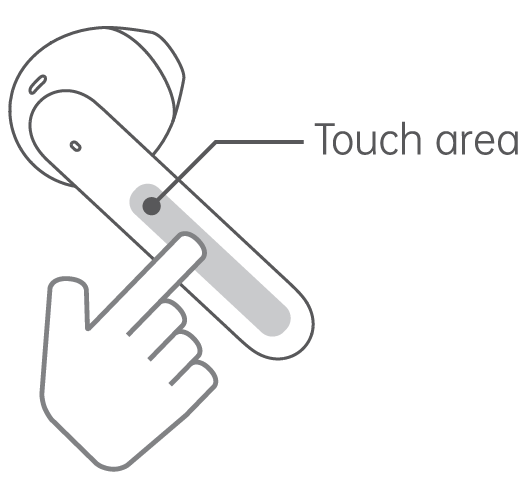
Double tap to answer/end a call, or play/pause the track.
Touch and hold to activate voice assistant.
※ Whether voice assistant is supported depends on the brand and model of the device.
Slide
Left headphone: Slide up/down to increase/decrease volume.
Right headphone: Slide up/down to play next/previous track.
4.6 Wearing Detection
When you listen to music while wearing both units of the headphones, the music playback will be paused if either of them is removed. When the removed unit is worn again, the music playback will be resumed.
4.7 Charging
Check charge status
• The Indicator shows charge status of the headphones when they are in Charging Case. Otherwise, the Indicator shows charge status of the Charging Case.
• The indicator color indicates the battery level, red indicates low battery, yellow indicates medium power, and green indicates high battery.
• When the remaining battery charge of the Charging Case is low (the indicator lights red), the Charge Case can only complete one full charge of the headphones at most. Please charge the Charging Case in time.
Charge the headphones
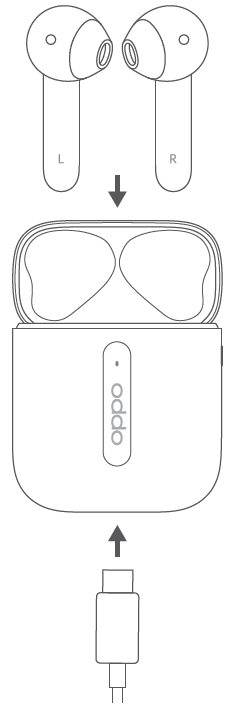
The headphones charge while in the Charging Case.
※ If the device is left to lie idle for long periods, charge it every two months; otherwise, the headphones may not work properly.
Charge the Charging Case
Use the USB-C Cable to charge the Charging Case. The Indicator will light up when charging.
4.8 Resetting
With the headphones in the Charging Case and lid open.
Press and hold the Function Button untill the Indicator flashes red three times. Then the headphones have been restored to factory settings.
5. Function Test
5.1 Bluetooth Connection Test
1. With connected mobile phones, you can quickly connect after opening the charging case (most connect within 5s, and a few connect within 10s)
2. Put the headphones back on the charging case. After closing the lid of the charging case, the Bluetooth connection will be disconnected within 5s. If you turn it on again, it will automatically reconnect.
3. An earphone can be connected separately. At this time, the mobile phone only displays the power of the worn earphone.
4. Bluetooth signal test: The mobile phone is placed on the desktop, the headphones is worn, music is played or a call is made, and the distance between the headphones and the mobile phone (no obstruction in the middle) ≤ 10m indicates that the signal is abnormal.
Note: There is an obstruction between the mobile phone and the headphones (when the object or the human body is stuck, the phenomenon of jamming may occur during the distance)
5.2 Headphones Listening Function Test
1. Play music, slide the left ear touch area up, and adjust the volume to the maximum. Pay attention to the volume adjustment evenly, and the volume cannot suddenly increase. (Headphone volume has 16 divisions, each division is 2 divisions, there will be a beep when sliding to the maximum or minimum volume)
Note: The volume of the headphones and mobile phone cannot be adjusted automatically.
2. Play the music, wear the headphones well, and listen to whether the volume of the left and right ears is the same (it is important to measure this after replacing the single earphone separately for the user, it is best to confirm with the user when the user picks up the machine)
3. Play music, slide the right ear up to switch to the previous song, slide down to switch to the next song, double-click to pause and play music (note: the tapping function is located on the head of the headphones, so tapping as far as possible can improve sensitivity)
4. Play the music, wear the left and right ears, the left and right ears are normal at this time, then remove the left ear, the music is paused, then wear the left ear music to continue playing; remove the right ear, the music is paused, and then wear the right ear to continue to play the music.
5.3 Headphones Call Function Test
1. Wear the headphones, make a call, pay attention to whether the sound is low in the first 10s, and then normal.
2. Make a call, test whether the other party hears noise, electric current, or broken sound.
3. Wear the headphones, double-click to access the phone, listen to the other party's voice and whether the other party's listening is normal, double-click to hang up the phone
5.4 Charging Function Test
1. When the headphones is placed in the charging case, the box will light white for 1s, indicating that the headphones has been placed in the charging case.
Note: Failure of the headphones in-box detection will directly affect charging (the headphones does not charge)
2. Put the headphones in the charging case, close the charging case cover, and then open the charging case cover. At this time, the charging case indicator light indicates that the Hall switch function of the charging case switch is normal, and the color of the indicator light at this time represents the power of the headphones (if two headphones’ battery is inconsistent, the lower battery status is displayed), red indicates low battery (<20%), yellow indicates medium battery (20% -80%), and green indicates high battery (greater than 80%).
3. Use the Type-C charging cable to charge the charging case. The indicator light will turn on when charging, indicating that the charging case has entered the charging state.
Note: If the user feedbacks that the headphones is not charging, first check whether the charging contacts of the headphones (located on both sides of the mic hole at the bottom of the headphones) are dirty and corroded. If the corrosion is severe, remind the user to put the headphones back when using the headphones. If there is more sweat before charging the box, wipe the contact sweat with a tissue or cloth.
Check whether the charging shrapnel of the charging case earphone can expand and contract normally, if it is blocked by foreign objects. If the shrapnel fails to stretch normally (perhaps the sweat crystal may affect the normal expansion and contraction of the shrapnel), you can repeatedly press the shrapnel with a cotton swab moistened with water, and then blow it with a wind gun at 60°C for two minutes.
5.5 Voice Assistant
1. Long press to wake up the voice assistant. (OPPO phones will wake up Breeno, other voice assistants depend on the model brand).
2. Execute an instruction, such as asking the weather of the day.
5.6 Other Function Test
1. Query software version: After the headphones is connected with Bluetooth, click the isetting button-firmware version number.
2. Pair the left and right ears / restore the factory settings: Put the headphones in the charging case, and press and hold for 15s until the red light on the charging case flashes three times.